Wednesday, 15 August 2018

1/32 Telescopic Rams How To Guide

Be it a front loader, tipping trailer or other piece of machinery telescopic rams are everywhere on a farm so being able to model them is a great skill.
There are a number of off the shelf options available from the likes of farmmodels.nl but the best and cheapest way to get a ram the perfect size is using car aerials. These are available on ebay for as little as 99p. The issue comes with the fact that generally they are too long, or have too many sections to be used straight on a model. Therefore they need cutting down. this guide demonstrates how to do that.

Starting with the aerial out of the packet the top nib and the bottom hinge need removing


To remove the hinge I use a set of modelling pipe cutters, a craft knife will do the same job but will blunt very quickly.

Hinge removed

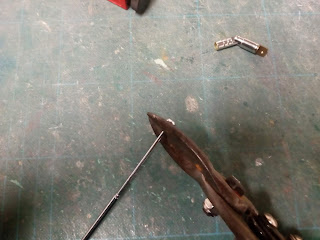
The nip is simply cut off with a set of tinsnips

Pushing down on the top of the aerial the whole unit will slide out of the outer tube, along with two copper shims.

Keep these shims safe as they will be needed later.

Repeat the process till you have removed each section of rod from the aerial. At this stage you can get rid of any sections you don't need. In this case I am making a five stage ram so only the very smallest rod wasn't needed. In the case of a silage trailer you may want two rods from the middle depending on the desired diameter.

I find using a craft knife for the next bit is more accurate than the pipe cutters and also doesn't crush the tube as much making replacing the copper shims easier. The length of the ram is decided and each part cut to size, the first and last sections are cut longer than the others to allow room for eyelets to pivot from. The knife is used to roll the tube along deeply scoring the metal, the tube is then snapped off at the correct length. Measure the length from the curled end of the tube and NOT the end with a hole drilled in.

Some deformation of the tube will occur, a diamond file is used to re-round the tube so it will slide over each section better.

Using a punch a hole is marked out ready for drilling the hole the copper shim sits in.

The hole is drilled out, matching the diameter of the original hole. Here I have made a simple jig to hold the tube while drilling compromised of one large piece of mount board, with a smaller piece glued on top that the tube pushes against. The tube may need tidying with the file again at this stage to make sure it is round and unobstructed.

This process is repeated for every section of tube.

The copper shims can be put back as they came out but this will severely limit the length of travel achieved by the ram. Therefore I cut the shims down so they are the same length either side of the indent. This is done with tinsnips, then a pair of pliers are used to re-round the shims.

The shims are placed back with the indent sitting in the hole. And now the tricky bit.

Starting with the smallest two tubes the smaller tube must be pushed back into the larger one, and the copper shims pushed in with them, this is why it was important to file the tubes back to round. If you are having trouble getting the shims in try flaring the edges of the tube out with the file or a punch.
Repeat for each section of ram, going up in size each time.

To make the top eye I have squished the tube with pliers.

The drilled a hole in the flattened tube.

I drilled the bottom eye along with all the shim holes so that leaves the finished ram ready to fit in the trailer.

Wednesday, 28 February 2018

Dying Sisal Rope

Sisal rope is a great versatile modelling material, the main application within model farming is as straw, either loose or baled. But it can also be effectively used as vegetation to add life to a diorama. In either case its natural colour isn't quite right for purpose and so we need to dye it. I suspect there are various methods for dying it but I will just demonstrate one that I know works.
What do you need? Some sisal, chopped, a mixing pot, and some paint. In this case for speed I'm just using some acrylic deep yellow to make a straw colour. For more accurate colours mix up your own pallet. I'm using acrylic as it is fast drying and can be watered down but any paint should work.

I start by adding a drop of paint to the side of the tub.

Then scoop the paint up with a clump of sisal.

Rub the sisal between your fingers and thumb to move the paint around, if you are struggling to spread the paint wet you hand with water and continue, this thins the paint down making it spread easier.


Thoroughly spread the paint so the sisal is all pretty much the same colour. It is now died and read to use. If you are making bales it is great to make the bale out if the sisal while its still wet, as it dries the paint will hold the sisal as well as the twine making the bale less prone to splitting.
The dyed sisal compared with the natural rope colour.
The light colour of sisal means it lends itself to dying any colour, here yellow, green and brown have been made.

Making Square Bales - Baling

With the baler made its now time to bale the straw.
To start with cut some strands of cotton, I'm using which reald cotton here so it shows up on camera, really a fine orange thread would be more suitable or any colour of your choosing. Once cut line them up centrally in your baler as shown.

Pinch the strands between your finger, thumb and the balerholding them tight. Then add the first layer of straw, evenly covering the strands.

Compress the straw with the plunger keeping the twine tight, then let the twine drop a little moving the straw down the chamber.

Add another layer of straw, compact and move down. Repeat until the bale reaches the bottom of the chamber. 

When you are happy the bale is well compacted tie the string in knots. This is where the notches to the holes help as the string can be tied tight and close to the bale.

Tie the knot

And trim the excess string

And repeat for all the string

Give the bale one last compaction

 And then pull out the base plate

Flip the chamber upside down and compact the other end of the bale with the plunger.

Moving back to the top of the chamber use the plunger to push the bale along the chamber.

And out of the bottom

VoilĂ , one bale

You can just see the like along the centre created by the groove.

A stack of bales.
The sisal isn't quite the right shade for any straw and so to improve the appearance there are a few methods. For the two bales shown on the left the sisal has been dyed, see here for how to dye sisal. (I now have a method for dying sisal in larger quantities which can be found here)The one on the right has simply been spray painted after being made, the paint doesn't adhere to the twine while nicely coloring the sisal. The ideal method here would be to airbrush various shares onto the bale.
Hopefully this guide has been useful, any ideas or suggestions on improvements feel free to share them.

Making Square Bales - Making the Straw and Building a Baler

Within this page I aim to explain the process for making square bales. The process is applicable for both large and small bales and 1/32 & 1/16 scales.
To start with you will need some straw to bale. There is an array of materials that can be used but the most realistic I have found, both in appearance and behaviour is fine chopped sisal rope. Making this is the most tedious part of the process. How you chop the sisal is up to you, a knife is suitable (check out this video which seems to be a very quick method of production), as are scissors (for thicker rope tin snips are a suitable substitute for scissors). My preferred method is with a guillotine, you want to be chopping the sisal into about 5mm stands so it separates out from the rope nicely. Chop as much as need, as a guide I find a large quadrant bale requires about 30 grams of sisal, a small bale 2-3 grams.
Guillotine


About 5mm strands are best for making bales, the rope should seperare nicely as its cut, if it remains in a rope untwirl it by hand or cut your strands smaller. It takes a while to build up a good level of stock, I find the guillotine fastest, a 500g back could be made in half an hour.

Now you have the straw you next need a baler. I will add to this section at a later date with 2d plans for one but for now this sectional view should suffice. The basic principle is a bale chamber, that you fill with straw, and a plunger to compress the straw. Added to this are guides to hold the twine where you want it, and a slot at the bottom to push the bale out. Dimensions for a small baler and a quadrant baler chamber (x,y,z) in 1/32 are included units are centimeters. For ither bales a quick google should give you the real dimensions and then just divide them by 32 or if making for a particular model make to those dimensions. The bales tend to grow a little as the stretch into the string so consider making the chamber shorter (z) than the actualll measurements would suggest. The following photos should show the construction method I have used.


The baler, constructed from laminate flooring and pine strip wood, both left over materials. Anything strong enough and easily workable will do. Note the slot for the bottom, this allows the bale to be built up and then it is slid out and the bale pushed out. The slot is milled out using a pillar drill.

The guides for twine. These are drilled out and then notches cut down, the notches make tying the twine easier.

The sides where built up with appropriate sized stripwood. A thin Mount board layer was sandwiched between, set back from the timber, to create a groove. This produces the line down the middle of the bale like a real one.

Looking up the bale chamber, note the groove on each side.

Showing the bottom plate slid into position